|
|
| |
| |
| |
| |
| |
|
|
| |
| |
| |
| |
| |
FREE Downloads
|
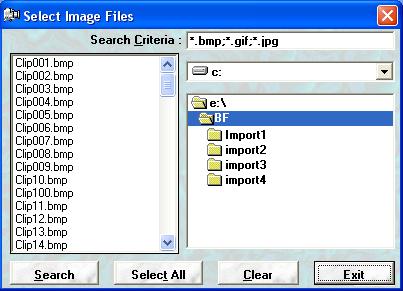
Stabilizing Video Frames The general method for stabilizing video frames involves matching up the position of a feature within the content of the video. The content is used as a reference which is usually the background or a moving object in the foreground. Stabilizing the background allows you to view an object moving in the foreground, while stabilizing a foreground object causes the background to move relative to the object. Both methods remove the motion of the camera. Stabilizing the background requires a large enough section of the image to capture all the movement in the foreground. This usually requires a panoramic view of the frame. Tracking a foreground object, however, isolates only the moving object, which requires a view only as large as the object. The first step in stabilizing a video is capturing its frames or importing its captured frames from an alternate source. Here is a method for turning your DVD Player into a frame splitter application. Importing Video Frames You can import files to be stabilized by selecting the Import Frames option from the U2Browser toolbar. The following dialog form prompts the user for the file selection:
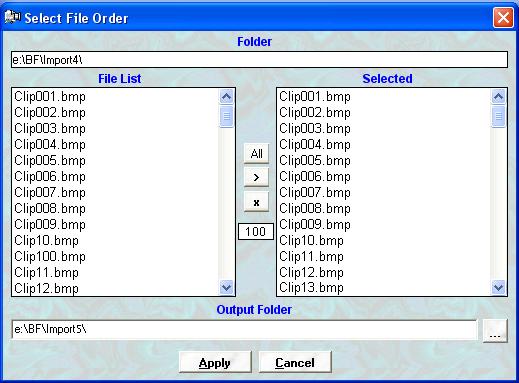
When 2 or more files have been selected the following form sets the frame order.
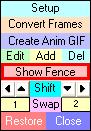
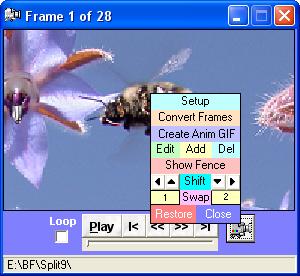
Importing the frames either makes copies of, or renames the files to the XXXX.ext format, where XXXX is 0001 to 9999 and ext is either BMP, JPG or GIF. The Crop Fence Once you have a sequence of frames from the video, you can stabilize them with the Frame Player. Select Play Frames from the U2Browser toolbar and load the sequence of frames. After the Frame Player loads the first frame, click on the Camera icon then select Show Fence.
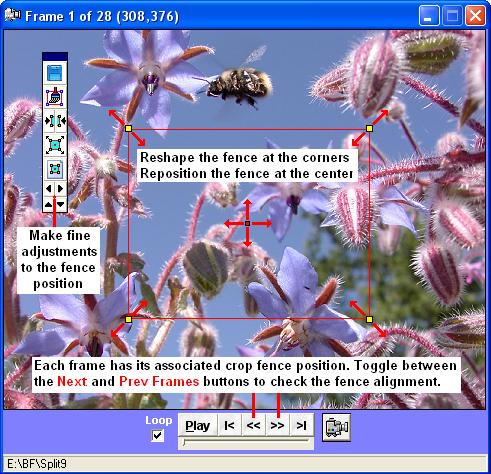
The Crop Fence is a red bordered, transparent rectangle with yellow corners and a red dot at the center. Move the fence by dragging the center dot. Reshape the fence by dragging the corners. The Crop Toolbar provides options to Save, Clear, Copy, Expand, Crop, and Shift the crop fence data.
When the crop fence is visible, its position is automatically recorded when navigating to a another frame. If a frame's crop fence has not been defined (un-initialized) then the last defined crop fence is used as the default until the fence is re-positioned.
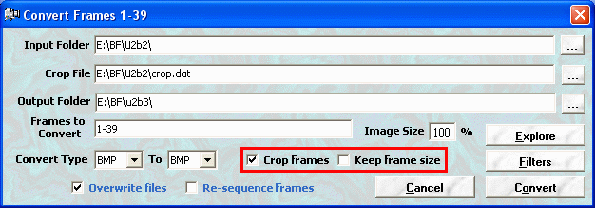
Cropping the Frames If the crop fence has been positioned carefully for each frame, then the cropped regions should represent a relatively stable sequence of images. Fine adjustments will likely be required, but its useful to create a new sequence of images to preview the stabilization thus far. You can always go back to the original sequence and make more adjustments and re-crop the frames. It is recommended that all output files be of type BMP until a final conversion is required, such as for creating an animated GIF. The BMP format does not lose any image quality (no compression) unlike for JPG and GIF formats. The trade-off being, that BMP files require much more disk space to store them. However, if you have the disk space, use BMPs.
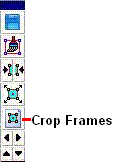
Select the Crop Frames button on the Crop Toolbar to crop the frames. At this point, don't bother to add any enhancements to the images. Create the cropped (stabilized) frames first. If all the frames are the same dimensions then the Keep frame size option does not apply. If this option is selected and the frames vary in size, then the largest frame in the sequence is used and all the other frames are forced to fit its dimensions. Note that this changes the aspect ratio for all frames that are proportioned differently than the largest frame.
Now load the sequence of cropped frames into the Frame Player and preview them. At this point, the frames should only require fine adjustments to complete the stabilization.
Use the Next and Prev Frame buttons to determine if the Next frame needs to be shifted Up, Down, Left or Right relative to the Prev frame. This shifts the image 1 pixel at a time. Note that shifting any portion of the image beyond the frame dimensions loses a row or column of pixels. This loss is made permanent when navigating to another frame. To restore the original image before shifting, select the Restore option before moving to another frame. Some frames may also require a Rotation for proper alignment relative to the Prev frame. This can be done for single frames in the Frame Editor or done in mass via the Convert Frames form. Make fine adjustments to all the frames as required then select Play to preview the stabilized frames. At this point the frames should be completely stabilized and there are likely several frames that show white sections at the borders caused by the fine adjustments. The last step in the stabilization is to crop the frames just enough to remove the white sections. If too much of the frame must be cropped to remove the white sections, then the alternative is to use the Mask feature to fill in the white areas with pixels from the previous frame (or using a background mask frame). The Final Cropping The final crop is done by positioning the crop fence in frame 1 (ONLY). Make sure the crop fence has not been set for any other frame. Use the Clear Crop Data option before setting the crop fence for frame 1 to ensure this is the case. When the crop fence has been positioned for frame 1, select Save Crop Data. Now select the Crop Frames option. All frames that have not been defined (all but frame 1) will be assigned the crop dimensions of the last defined frame (frame 1). This allows you to crop the entire sequence of frames without defining the crop region for every frame. Since the frames are already stabilized, the cropped region can remain fixed for all frames. Image Enhancements Now that the frame sequence has been cropped and stabilized, the images can now be resized and enhanced. It is recommended that a single frame from the sequence be loaded into the Frame Editor to preview any enhancements before committing them to the entire sequence. Once the final enhancements are made, the frames can be exported to the Windows Movie Maker application and converted to a video, or they can be used to create an Animated GIF which can also be converted to a video in Windows Movie Maker. It is recommended that the highest video quality be used for the conversion since submitting the video to YouTube requires yet another conversion to the Flash Video format.
|
Steps to Stabilizing Video Frames
|
||||||||||
|
U2Browser Copyright © 2007. All Rights Reserved. |