|
|
| |
| |
| |
| |
| |
|
|
| |
| |
| |
| |
| |
FREE Downloads
|
Playing Video Frames The Video Frame Player accesses a folder containing a collection of captured video frames which are named 0001.ext to 9999.ext where ext is either BMP or GIF or JPG. Video frames that were not captured by the Frame Recorder must be imported and renamed to the 0001.ext file naming convention. Here is a method for turning your DVD Player into a frame splitter application. Frames are loaded individually from the HD and are not intended to be displayed at an accurate frame rate. A frame delay can be used to slow down the displayed frames, however, loading the frames creates its own delay which varies with the size of the files. The Frame Player was intended as a tool for accessing individual frames to enhance and stabilize the images. The edited frames can then be recombined into an animated GIF file or imported into a video editor such as MS Movie Maker to create a video. To load the Frame Player, click on the Camera icon and select Play Frames.
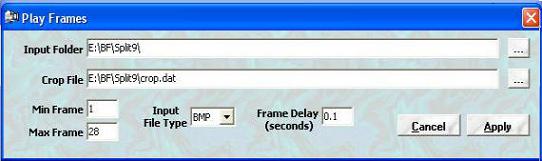
Which opens the following setup form.
The Input Folder is where your frames are located. The Crop File is a data file that contains the crop region for each frame. This information is used to crop and stabilize the frames. The Min Frame and Max Frame fields indicate the frame range in the input folder for the Input File Type, which is either BMP, GIF or JPG. These values can be redefined by the user if they are within the frame range. The Frame Delay is applied if the frames are loaded and displayed faster than the delay time. The display rate depends solely on the dimensions of the image files and large files display slower. Click on the Apply button to commit the settings and close the form. The Frame Player appears displaying the first frame.
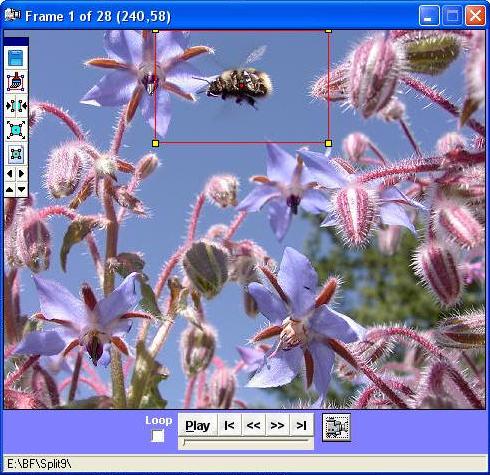
Click on the Camera icon to access the Play Frame options
Using The Crop Fence The crop fence can be reshaped by dragging any of the four corners to a new position. There is a red square in the center of the fence that can be dragged to reposition the crop fence while maintaining its shape. Reshape and reposition the fence to isolate the desired crop region. When the crop fence is visible the crop data is automatically saved when navigating to another frame. The fence dimensions for each frame will be the dimensions of the image after cropping. It is usually a good idea to keep the frame size consistent. Move the fence by dragging the red square in the center of the fence region. Use the corners for resizing the fence for the first frame only.
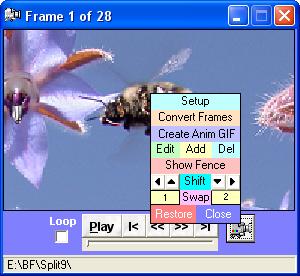
The crop menu palette may be repositioned by dragging the blue section at the top of the palette. The Crop option opens the Convert Frames form with the Crop Frames option checked. Select the various filter options if additional processing is required. If the crop fence has not been defined for a frame, then the last initialized crop fence is assumed. For example, if you set the first crop frame only, then the rest of the frames will be cropped the same as frame 1. This is useful when making the final cropping of a stabilized sequence to clean up the edges caused by shifting the images into stability.
|
Steps to Stabilizing Video Frames
|
|||||||||
|
|
|
U2Browser Copyright © 2007. All Rights Reserved. |